rCore第三章
加载
我们需要将程序根据编号加载到内存的对应位置,那么OS就可以根据编号选择对应的任务进行调度。由于不同程序所在的地址不同,所以链接文件的基地址也必须不同,这里使用一个python脚本进行实现。
import os

base_address = 0x80400000
step = 0x20000
linker = 'src/linker.ld'

app_id = 0
apps = os.listdir('src/bin')
apps.sort()
for app in apps:
    app = app[:app.find('.')]
    lines = []
    lines_before = []
    with open(linker, 'r') as f:
        for line in f.readlines():
            lines_before.append(line)
            lines = line.replace(hex(base_address), hex(base_address+step*app_id))
            lines.append(line)
   	with open(linker, 'w+') as f:
        f.writelines(lines)
    os.system('cargo build --bin %s --release' % app)
    print('[build.py] application %s start with address %s' % (app, hex(base_address+step*app_id)))
    with open(linker, 'w+') as f:
        f.writelines(lines_before)
    app_id = app_id + 1
这个python脚本对于每一个app源文件都做相同的操作,将链接文件中的base_address替换为app_id对应的地址使用的地址,之后使用cargo build进行编译,编译完成后就可以恢复链接文件。
编译这些编译完成后的二进制文件,需要加载到内存中
pub fn load_apps() {
    extern "C" { fn _num_app(); }
    let num_app_ptr = _num_app as usize as *const usize;
    let num_app = get_num_app();
	let app_start = unsafe {
        core::slice::from_raw_parts(num_app_ptr.add(1), num_app+1)
    };

    for i in 0..num_app {
        let base_i = get_base_i(i);
        (base_i..base_i+APP_SIZE_LIMIT).for_each(|addr| unsafe {
            (addr as *mut u8).write_volatile(0)
        })
        let src = unsafe {
            core::slice::from_raw_parts(
            	app_start[i] as *const u8,
                app_start[i+1] - app_start[i]
            )
        };
        let dst = unsafe {
            core::slice::from_raw_parts_mut(base_i as *mut u8, src.len())
        };
        dst.copy_from_slice(src);
    }
    unsafe { asm!("fence.i"::::"volatile");}
}
由于布局信息的格式从地址到高地址为,app_num、第一个程序起始地址、第二个程序的起始地址、...、最后一个程序的起始地址、最后一个程序的结束地址。首先生成首地址,这里使用unsafe去生成一个引用。这里OS的视角最后看到的所有程序,会像一个数组一样分布在内存空间,做这个假设的前提是每个程序占用的空间相同,由于我们现在的程序都不大,所以可以通过一个APP_SIZE_LIMIT进行限制。这个数组的每个区间一开始都要清零,之后通过如下关键语句将代码拷贝到每个区间的首地址。
let src = unsafe {
    core::slice::from_raw_parts(
    	app_start[i] as *const u8,
        app_start[i+1] - app_start[i]
    )
};
let dst = unsafe {
    core::slice::from_raw_parts_mut(base_i as *mut u8, src.len())
};
dst.copy_from_slice(src);
于是我们执行的时候就可以通过跳转到对应的区间入口,进行程序调度。
任务切换
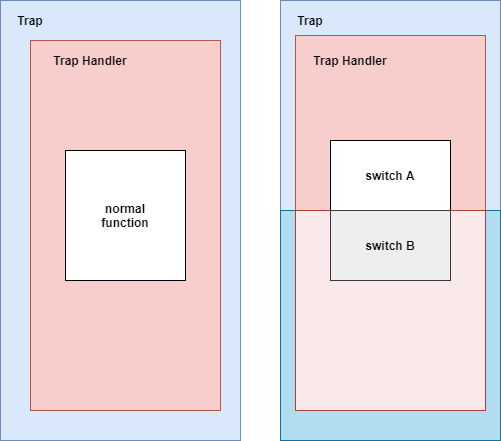
一个任务在运行中途可以主动或者被动地交出执行权,为了保障程序的正确执行,我们需要保存其上下文。这里的上下文切换和trap上下文切换不同,它不涉及特权级的转化,一部分寄存器的保存由编译器进行完成。这里的任务切换,实际上是在进入了trap控制流后调用__switch函数,这里的switch和普通函数的区别就是其会换栈。
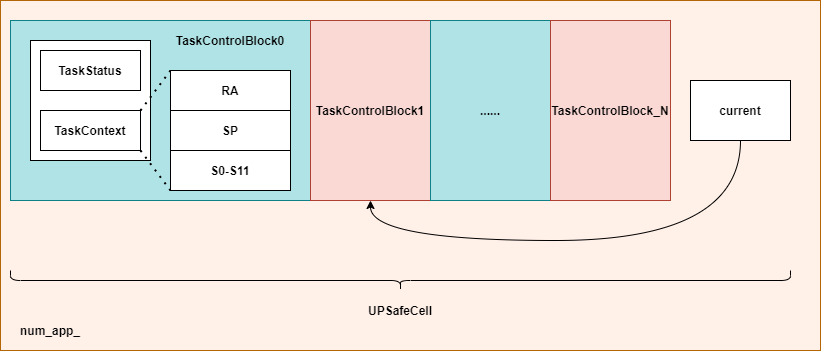
如上图所示就是TaskManager的结构,每一个TaskControlBlock负责一个任务的状态管理,而current指向当前正在执行的任务。我们要进行任务切换时会执行类似如下的语句:
TaskContext *current_task_cx_ptr = &tasks[current].task_cx;
TaskContext *next_task_cx_ptr = &tasks[next].task_cx;
我们执行时在trap中会进行一个换栈,将执行流转移到下一个任务,使用下一个任务的trap上下文返回到用户态。具体执行的代码如下:
fn find_next_task(&self) -> Option<usize> {
    let inner = self.inner.exclusive_access();
    let current = inner.current_task;
    (current+1..current+self.num_app+1)
    	.map(|id| id%self.num_app)
    	.find(|id| inner.tasks[*id].task_status == TaskStatus::Ready)
}

fn run_next_task(&self) {
    if let Some(next) = self.find_next_task() {
        let mut inner = self.inner.exclusive_access();
        let current = inner.current_task;
        inner.tasks[next].task_status = TaskStatus::Running;
        inner.current_task = next;
        let current_task_cx_ptr = &mut inner.tasks[current].task_cx as *mut TaskContext;
        let next_task_cx_ptr = &inner.tasks[next].task_cx as *const TaskContext;
        drop(inner);
        unsafe {
            __switch(current_task_cx_ptr, next_task_cx_ptr);
        }
    } else {
        println!("All applications completed");
        use crate::board::QEMUExit;
        crate::board::QEMU_EXIT_HANDLE.exit_success();
    }
}
其中find_next_task这个函数用于找到下一个状态为Ready的任务, 并返回这个任务的id。接下来对run_next_task进行解析,这里使用let Some()语法,直接返回的结果赋值到next中,之后使用current_task_cx_ptr和next_task_cx_ptr表示当前任务和下一个任务的上下文,最后在unsafe中调用__switch函数切换上下文。
	.section .text
	.global __switch
__switch:
	sd sp, 8(a0)
	sd ra, 0(a0)
	.set n, 0
	.rept 12
		SAVE_SN %n
		.set n, n+1
	.endr
	ld ra, 0(a1)
	.set n, 0
	.rept 12
		LOAD_SN %n
		.set n, n+1
	.endr
	ld sp, 8(a1)
	ret
这里ra中最后将是一个任务的地址,ret后将执行下一个任务。下图就是switch过程发生的变化,switch在执行load后就转化到了另外一个任务的上下文,trap上下文也是另外一个任务的内核栈。
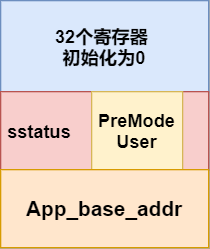
第一次执行
第一次执行,我们需要自己构造任务的上下文,然后使用上一章就提到的restore方法进行启动。在TaskManager结构体中实现了方法run_first_task:
fn run_first_task(&self) -> !{
    let mut inner = self.inner.exclusive_access();
    let task0 = &mut inner.task[0];
    task0.task_status = TaskStatus::Running;
    let next_task_cx_ptr = &task0.task_cx as *const TaskContext;
    drop(inner);
    let mut _unused = TaskContext::zero_init();
    unsafe {
        __switch(&mut _unused as *mut TaskContext, next_task_cx_ptr);
    }
    panic!("unreachable in run_first_task!");
}
这里直接使用了task[0],原因是TaskManager使用了lazy_static! 第一次使用时会被初始化。
pub static ref TASK_MANAGER: TaskManager = {
    let num_app = get_num_app();
    let mut tasks = [TaskControlBlock{
        task_cx: TaskContext::zero_init(),
        task_status: TaskStatus::UnInit,
    }; MAX_APP_NUM];

    for (i, task) in tasks.iter_mut().enumerate(){
        task.task_cx = TaskContext::goto_restore(init_app_cx(i));
        task.task_status = TaskStatus::Ready;
    }

    TaskManager {
        num_app,
        inner: unsafe {
            UPSafeCell::new(TaskManagerInner{
                tasks,
                current_task: 0,
            })
        },
    }
};
其中TaskContext::goto_restore(init_app_cx(i))用于初始化TaskContext:
pub fn init_app_cx(app_id:usize) -> usize {
    KERNEL_STACK[app_id].push_context(TrapContext::app_init_context(
    	get_base_i(app_id),
        USER_STACK[app_id].get_sp(),
    ))
}
impl TaskContext {
    //...
    pub fn goto_restore(kstack_ptr: usize) -> Self {
        extern "C" {
            fn __restore();
        }

        Self {
            ra: __restore as usize,
            sp: kstack_ptr,
            s: [0; 12],
        }
    }
}
这里引用第二章中的内核栈的解析图,如上图所示,在init_app_cx中,执行了一个push_context,这个函数用于将这个生成的上下文内容压入内核栈。但是这里我们需要的是任务上下文,所以有所不同,所以需要进一步的封装。
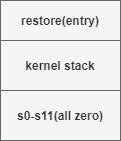
这里将entry即ra赋值为restore的地址,同时kernel stack区域即sp赋值为内核栈指针当前位置。之后根据代码可以看到将每一个任务的状态设置为ready后。最后对于整个TaskManager进行初始化,用UnSafeCell对于整个结构进行包裹。
有了这个任务上下文之后,回看之前的启动代码,就可以进行启动。
unsafe {
        __switch(&mut _unused as *mut TaskContext, next_task_cx_ptr);
}
这里将task0的上下文作为next_task_cx_ptr,调用switch之后就可以切换到task0的上下文。之后由于将ra的地址设置为了restore,所以switch的ret之后会调用restore。restore回使用sp作为内核栈的地址,将内核栈中的内容作为上下文进行还原,于是这个任务就启动了。
系统调用
这一章实现了两个系统调用,sys_yield和sys_exit。如下是两个系统调用的具体实现:
use crate::task::suspend_current_and_run_next;

pub fn sys_yield() -> isize {
    suspend_current_and_run_next();
    0
}

pub fn sys_exit(exit_code: i32) -> !{
    println!("[kernel] Application exited with code {}", exit_code);
    exit_current_and_run_next();
    panic!("Unreachable in sys_exit!");
}
suspend_current_and_run_next() 和 exit_current_and_run_next都调用了TaskManager中的实现。
pub fn suspend_current_and_run_next() {
    mark_current_suspend();
    run_next_task();
}

pub fn exit_current_and_run_next() {
    mark_current_exited();
    run_next_task();
}

fn mark_current_suspended() {
    TASK_MANAGER.mark_current_suspended();
}

fn mark_current_exited() {
    TASK_MANAGER.mark_current_exited();
}

fn run_next_task() {
    TASK_MANAGER.run_next_task();
}

impl TaskManager {
    fn mark_current_suspended(&self) {
        let mut inner = self.inner.borrow_mut();
        let current = inner.current_task;
        inner.tasks[current].task_status = TaskStatus::Ready;
    }

    fn mark_current_exited(&self){
        let mut inner = self.inner.borrow_mut();
        let current = inner.current_task;
        inner.tasks[current].task_status = TaskStatus::Exited;
    }
}
yield和exit的区别就是,yield的任务只是将任务的状态设置为READY,而exit会将任务的状态设置为EXIT导致任务不再被调度。最后这两个系统调用都会将执行权交给下一个任务。
时钟中断
这里时钟中断用于实现抢占式调度,抢占式调度可以使得应用随时被调度,而不用等待应用主动交出执行权。我们这里要求每个应用只能执行一段时间,之后内核就会强制将它切换出去。
我们使用时间片轮转调度的机制,这里主要依赖硬件提供的时间中断进行实现:
| Interrupt | Exception Code | Description |
|---|---|---|
| 1 | 1 | Supervisor software interrupt |
| 1 | 3 | Machine software interrupt |
| 1 | 5 | Supervisor timer interrupt |
| 1 | 7 | Machine timer interrupt |
| 1 | 9 | Supervisor external interrupt |
| 1 | 11 | Machine external interrupt |
而中断是否屏蔽会根据如下方式进行判断:
- 如果中断的特权级低于
CPU当前的特权级,则该中断会被屏蔽; - 如果中断的特权级高于
CPU当前特权级或者相同,则会通过sstatus或者mstatus进行判断。
我们在这里不考虑中断嵌套的情况,我们只考虑S特权级的情况。
我们使用SBI的来实现相关函数:
use riscv::register::time;

//获取mtime的计数值
pub fn get_time() -> usize {
    time::read()
}
之后是设置时钟相关的部分:
const SBI_SET_TIMER: usize = 0;

pub fn set_timer(timer: usize) {
    sbi_call(SBI_SET_TIMER, timer, 0, 0);
}

use crate::config::CLOCK_FREQ;
const TICKS_PER_SEC: usize = 100;

pub fn set_next_trigger() {
    set_timer(get_time() + CLOCK_FREQ / TICKS_PER_SEC);
}
这里的set_timer或设置mtimecmp,于是CLOCK_FREQ/TICKS_PER_SRC就可以设置多少个mtime可以触发一次时钟中断。
于是我们就可以编写时钟中断的处理函数:
match scause.cause() {
    Trap::Interrupt(Interrupt::SupervisorTimer) => {
        set_next_trigger();
        suspend_current_and_run_next();
    }
}
这里直接设置下一次触发时钟中断的时间,同时将当前任务设置为READY并调度下一个任务即可。